Almost 12% of the world’s population uses Apple devices. That’s a huge number! Their multi-faceted but easy to use nature has made the Apple devices so popular. Most routine tasks like checking mail, browsing the internet, making notes etc. are quite straightforward on a Apple device. Similarly, connecting to a WiFi network is quite easy and can be accomplished in some simple steps. So, let’s see how we can connect to WiFi on your iPhone or iPad.
- We start by clicking and opening the ‘Settings’ app on your Apple device.
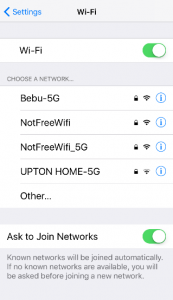
- Once the Settings app is open, check if your Wi-Fi is turned on. If it is off, turn on the Wi-Fi option by clicking on it.
Another way of turning the Wi-Fi on is by using the Control Center at the bottom of your device. Just click on the Home button once, and then swipe up from the bottom of the screen to bring up the Control Center. Then Once the control center is up, just click on the Wi-Fi icon to turn it on.
- Once the Wi-fi is turned on you will see all the available wireless networks.
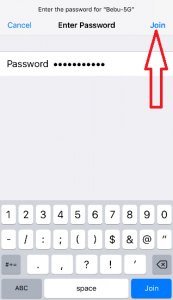
- Choose the network you want to connect to and enter the password. Then hit ‘Join’.
- To check if you have connected to the Internet successfully, try opening a commonly used website on your browser. If it opens successfully, you are all set!
While connecting to a wireless network in a public place like a mall or airport, they might make you open a browser and login with your credentials before letting you use the internet.
If you found this guide useful would you please leave us a comment below to let us know this was helpful. If there is a specific article or guide you’d like us to write please email us or leave a comment below. Have a look at our iphone cases as well.
Latest posts by Campad Electronics (see all)
- Apple Launches iPhone 16e - February 21, 2025
- Create a Wireless Charging Surface at Home for Less Than $50 - July 9, 2024
- Meet The Telstra 5G Hotspot - May 22, 2024

 Follow


