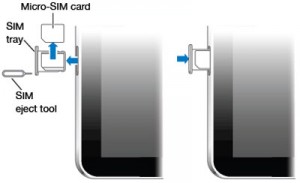
The Apple iPad 3G (and Apple’s iPhone 4) uses a Micro SIM instead of a normal sized SIM card. This micro SIM measures 15 mm × 12 mm in size while the normal sized SIM measures 25 mm × 15 mm in size.
To insert your Micro SIM card in your iPad 3G, follow the steps outlined below:
1. Turn off your iPad
2. Grab your Micro SIM eject tool that comes with iPad.
3. On the left hand side of your iPad find your iPad’s Micro SIM tray (pictured below).
4. Push your Micro SIM eject tool into the small hole and lightly push down until the tray pops-out. Remove the Micro Sim card tray.
5. Place your Micro SIM card into the SIM tray. Ensure the micro SIM sits neatly and that the circuit side of the micro SIM is facing downwards.
6. Now put the tray back into slot into its slot and push the tray back into the iPad in the same way you ejected it out. The SIM tray will click back into place and will be flush with the rest of the iPad’s edge.
7. Switch on your iPad and wait for iPad to recognize the SIM card.
8. Sync your iPad with your iTunes and if prompted to update network settings select yes.
You can convert your Normal SIM card to a Micro SIM using our “Micro SIM Cutting Tool” which allows you to cut you normal sized SIM card down to a Micro SIM size. You can then use your SIM on your iPad or iPhone 4.
Apple iPad and Iphone Accessories
Apple iPad Bluetooth Keyboard and Leather Case

 Follow

Laverne Schuchardt
I found a great…